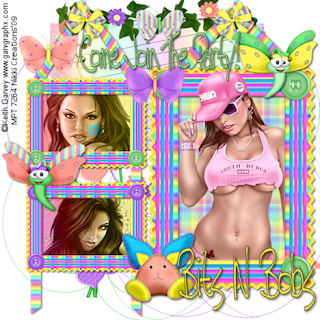
For This Tut You Will Need Working Knowledge Of PSP.
Supplies:
Tube of Choice: I am using the wonderful work of Keith Garvey. To use his work you will need a license. You can purchase one HERE.
Scrap Kit of Choice: I am using the fabulous FTU Scrap Kit called "BNB-hippity-hop" by Bits N Bobs. You can find the kit HERE.
Thanks hun!
Font of Choice: I am using Tall Paul
Ready? Let's Go!
Open a New Raster Layer 650x650 white.
Open Frame 1 and Frame 2. resize them both by 70%. Place Frame1 on the left side of the canvas and Frame2 on the Right.
Open Frame Hang and resize it by 40%. Place it under the Frame2 Layer
Grab your Magic Wand and click inside the first square on Frame1. Selections-Modify-Expand by 3 Add a paper of choice Selections-Invert-Delete-Select-None
Do this for the other square and the Frame2 Layer
Add both Doodles behind the Frame Layers. Place as you would like them.
Ass Journal2 behind the frame Layers as well.
Open bow3 and Resize by 50% then 50% again. Place on the tag and Duplicate-Mirror.
Now go Back to Frame1. Magic wand again in the first square. Add a tube of choice- Selections-Invert-Delete
Do this for the next square and in Frame2.
Drop shadow the Frame Layers.
Add the Rabbit1-Resize by 50% and place on the tag.
Add both Dragonfly's-Resize them by 50% and place them on the tag.
Add all 3 Butterfly's- Resize 2 and 3 by 50% and #1 by 40%. Place them on your tag.
Add a saying to your tag.
Merge your tag down and add your Copyright and license information.
Resize the tag by 80%.
Save as png or jpeg.
Your Done!
I hope you enjoyed this tutorial. I would love to see your creations. You can send me them and I will place them on the slide.
Any resemblance to another tut is purely coincidental.
Written By: Nicole April 7,2009

No comments:
Post a Comment