

For this tutorial you will need working knowledge of PSP!
Supplies:
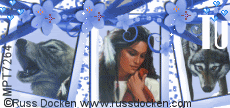
Tube of Choice: I am using the wonderful artwork by Joel Adams. You need a license to use his art. You can purchase one HERE.
Scrap Kit of Choice: I am using the beautiful FTU kit called "ML-Springtime" By Malu. It is her contribution to the Spring Blog train. You can get it HERE.
Tube of Choice: I am using the wonderful artwork by Joel Adams. You need a license to use his art. You can purchase one HERE.
Scrap Kit of Choice: I am using the beautiful FTU kit called "ML-Springtime" By Malu. It is her contribution to the Spring Blog train. You can get it HERE.
Thanks Hun!
Mask of Choice"
I have supplied the mask I used. If this is yours please let me know and I can credit you or take it down. You can get it Here.
Font of Choice: I am using Smudger LET
Ready? Let's Go!
Open a new raster layer 600x600 White
Open Frame2- Grab your Magic Wand- Selections-Modify-Expand by 4. Copy and paste a paper of choice. Selections-Invert-Delete-Selections- Invert, Add a Tube of Choice. Selections-Invert-Selections-None
Open Element07-Use your deform tool to resize and paste where you would like it.
Open Element17- Resize by 60% and paste in the left corner.
Open Element16- Resize by 50% and paste it in the right corner.
Open Element 22, 23, and 24 and Resize them by 30%. Rearrange them on your tag as you would like them
Open Element18- Resize by 40% and place where you would like it.
Open Element03- Copy and paste on your tag and Flip it. Place it under your flowers.
Open Element02- Resize by 60% and place under your flowers but over the rainbow.
Open Element13- resize by 40% and place where you would like it.
Open your mask layer in PSP.
Open a paper of choice and go to Layers-New Mask Layer-From Image- Find your mask. Merge-group.
Merge All Down
Save as png or jpeg and your Done!
I hope you enjoyed this tut. I would love to see your creations, you can email me them at sexy_nikkib@hotmail.com and I will post them in the slide show.
Any resemblance to another tut is purely coincidental.
Written By: Nicole
April 6,2009


No comments:
Post a Comment